Have some fun at my expense while raising money for Make-A-Wish

I’m honored to be part of the Hike Support Team for the Make-A-Wish Alabama Trailblaze Challenge again this year. 

I’m making it a bit more fun for you and challenging for me. Whoever donates the most before each training hike has the option to pick something I wear (probably over my hiking clothes) during the next hike.

We have 7 training hikes ranging in distances from 4-ish miles to 20-ish miles from January to April. 

The first hike is January 27th. Whoever donates the most before January 20, 2024 has the option to pick my outfit. Either you can provide or I will do my best from what I own/can find from a thrift store. There are NO RULES other than I  must be able to safely hike wearing it and it MUST be family friendly including nothing political or other volatile subjects. Other than that, it’s up to you!

Here’s your chance to have some fun at my expense and grant wishes! I have committed myself to raising the critical funds necessary for Make-A-Wish to help grant wishes for each eligible child with a critical illness. With your help, it’s possible. All funds I raise go to help grant wishes in Alabama. 

Did you know that Make-A-Wish grants more than 15,000 wishes nationwide every year? That’s a lot, yes. But that’s only 50% of the eligible kids.  Every hour of every day, on average, three children are diagnosed with a critical illness. Every one of these kids needs a wish to give them strength and help them heal.  I’m fundraising so more deserving kids and their families can know the true happiness, relief and renewal a wish can bring.  

These essential wishes are only possible because of supporters like you. Together, we are transforming lives- One wish at a time!Will you help me support Make-A-Wish by donating today?

https://secure2.wish.org/site/TR/Trailblaze/Make-A-WishAlabama?px=4246800&pg=personal&fr_id=5722

Posted in Backpacking | Leave a comment

Reflections after my first multi-day solo hike on the Pinhoti Trail

I went into this section hike knowing three things. I knew from previous experience my gear would perform, which gave me confidence. I knew it would be a physical and mental challenge, which I have been preparing for and looking forward to. I also knew it would be hotter and drier than normal, but I decided to go anyway.

Before I go any further, I have to say three things up front. USE THE FAROUT APP!  I can’t stress that enough. There aren’t many trail intersections, but the FarOut App kept me on trail with minimal searching more than once. Before you leave, make sure the map in downloaded for offline use. This trip would not have been as successful or enjoyable if I hadn’t used the FarOut App.  Second, the biggest “THANK YOU!!!!” ever goes out to the volunteers that maintain the trail. The Pinhoti Trail is well maintained with minimal blowdowns, nicely maintained actual trail bed, and well-marked using the blue blazes and flagging tape when needed. Lastly, and maybe most importantly, thank you to the Pinhoti Outdoor Center! Your shuttles, support, and picking me up when I wasn’t on the schedule is GREATLY appreciated.

This experience was a personal test as it was my longest backpacking trip to date by over 10 miles and my first solo multi day trip. I took videos and edited them using my phone for the first time, so that helped keep my mind busy. The trail was very quiet (I didn’t see any other hikers on the trail), and I had minimal cell phone reception, but I never felt unsafe.

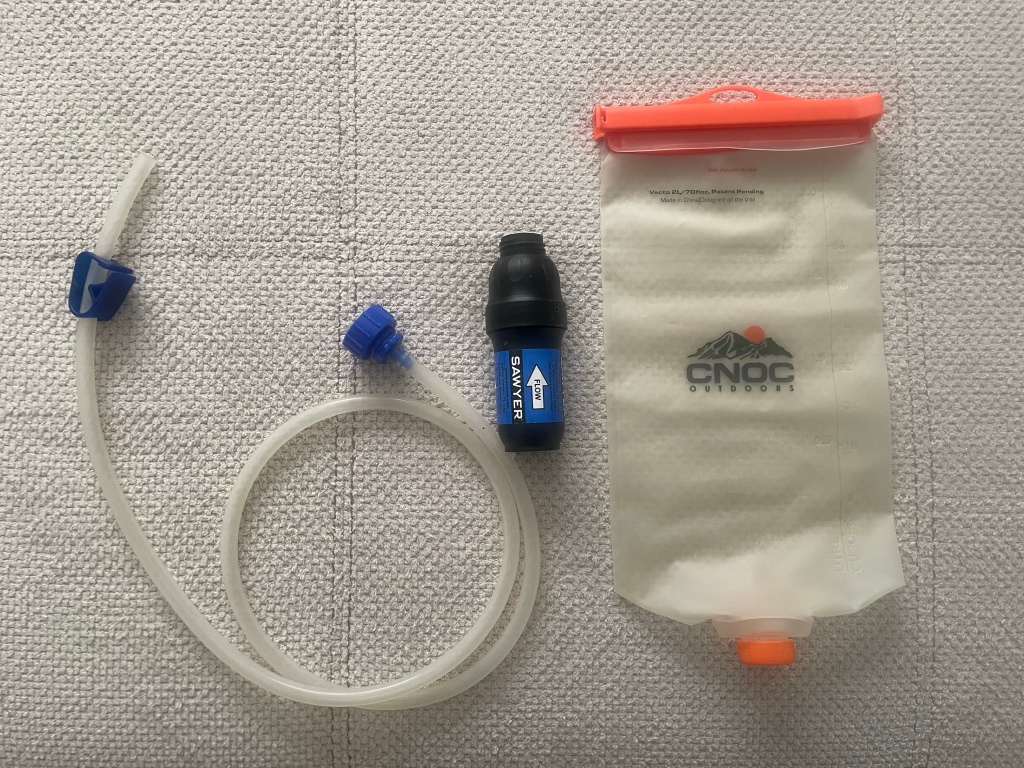
During my 3-night trip, most of the things I used performed exactly as expected without an issue. This includes the FarOut app and all of my major gear such as my hammock, tarp, quilts, water filter, socks, shoes, backpack, headlamp, stove, etc.

I also learned a few small things about things I carried. I learned that the headband on my headlamp glows in the dark – that was a nice surprise the first night! The last night I inaccurately estimated the distance between two trees and my tarp ridgeline was too short by about two feet. I was tired and my hammock was already set up and adjusted. I learned that my pack hanger can be used to extend my tarp ridgeline – so that’s nice to know. While the road walks aren’t a lot of fun, they actually weren’t as miserable as I expected, but I did both of them early in the morning. I would expect doing the road walk portion in the afternoon to be much worse as the road would also give off heat in addition to be being hot and exposed in general. At the last minute I decided to carry a cooling cloth to soak in water and put around my neck and I think that really helped me stay cooler. I confirmed that KT tape is great for blister prevention when you feel a hotspot. I ended the trip with zero blisters!

There are several items I carried on this trip that I never used and if I had to repeat this trip in the same conditions, I would not include them next time. This includes ALL of my stuff to stay warm. I took too much, and I never used any of it. This includes handwarmers, fleece toboggan, thin gloves, thin thermal pants, buff, and I wore the long sleeve shirt once so all of that would stay home. I never used my rain jacket, but I would carry it anyway. I can also use it to stay warm and it is in a “Here I am, come get me” bright orange if it was ever needed for that. I took 8 oz of denatured alcohol for stove fuel but averaged only using an ounce a day. I could easily have carried a few ounces less. I never used my “mug” in my cook kit, my cork massage ball, my sunglasses, and I accidently took two pair of glasses. I quit using my stuff sack for my top quilt after the first night. Just leaving all of the above-mentioned items would have reduced my pack weight by over THREE POUNDS!

I always try to reflect and think about what I would personally have done different after a trip. Here is what I would do differently if there was a “do over”. I would leave the above-mentioned items at home. I didn’t take ANY candy, and the sugar boost on some of the climbs would have been helpful and just enjoyable in general. I had a small sample of sunscreen in my first aid kit, but started applying it too late and my neck got a little sunburned, so I would have carried more and applied it earlier. During future backpacking trips on the Pinhoti, I will aim for daily mileage in the 15-mile range – especially in the next section between Bulls Gap and Cheaha State Park. Lastly, and probably most importantly, I would positively, absolutely, and without a doubt, make sure my water bottles are securely attached to my pack.

Speaking of water, I’ll address my decision to quit a day early when I ran low/out of water. I will admit my situation was all my fault and I don’t blame anyone or anything. I tried too much with too little and it was 100% my decision. I could have carried more water from Shelton’s Creek, made a water drop at Trammel Trailhead, or asked for assistance before I started over Rebecca Mountain. I did none of those options and I paid the price.

Should I have continued when I found water at White Gap? In hindsight, probably so. But this was a learning experience and I lived to hike another day. I ran out of water on top of Rebecca Mountain because I didn’t carry enough. I knew I was getting more and more dehydrated, but staying in one spot would not help my situation. I was fully aware of my situation and saw it slowly develop throughout the afternoon. My only choice was to get to water whatever it took, and the closest water was in front of me. Toward the end of the day, I was only sipping water when I realized I quit sweating. I hadn’t felt the need to urinate in HOURS. I was moving slower and resting more often. Was that smart? No. Did I have a choice short of a rescue operation? No – and it wasn’t THAT bad of a situation that I needed someone to come get me.

So, why did I quit? Reflecting back now, it was simply inexperience. I aim to be a self-sufficient backpacker – I dislike beggars on the trail, so I was trying to be self-supported. In my mind, water drops were for emergencies only and I considered my situation at White Gap a “near emergency” because I didn’t have any water left, so I didn’t have another option. Since I considered the water cache for emergencies only, I really didn’t drink enough Friday night because I wanted to be considerate of others behind me. Silly me – I could have refilled the water drop after I got off the trail!

I spent Friday evening and night sipping water. During the night I still had cramps, not feeling great, and was still really thirsty when I woke up on Saturday morning. During the same time, I spent hours considering what I should do – continue or stop while looking at FarOut to determine the exact minimum mileage I needed. There was a water drop in 3.3 miles at Bulls Gap then the next reliable water was 14 miles North of Bulls Gap at Dry Creek.

My plan Friday night was to get up early Saturday morning, get to Bulls Gap and spend time getting fully hydrated. From there, I was going to carry both of my 1 Liter bottles and Gatorade bottle full of water in addition to my full 2 Liter bladder attached to my filter. That would give me over 4 Liters of water carrying capacity for the next 14 miles. That was doable in my mind.

Saturday morning, I realized that I had lost one of my 1 Liter bottles during the previous day. That reduced my water capacity to 3 Liters. That greatly changed the situation. Knowing I was still slightly dehydrated from the previous day and thinking I only had a 3 Liter water capacity for 14 miles, I made the decision to stop. Taking the chance of making it wasn’t worth the risk of NOT making it.

The 3.3-mile hike to Bulls Gap was way more challenging than it should have been, and I consumed all of the water I had with me with the mostly downhill hike. The shuttle driver picked me up and we were talking about what happened during the drive back. He mentioned that I could have simply taken one of the gallon jugs of water and used it for water storage during the dry spell. I hadn’t even thought of that as a possibility. My inexperience made me believe the water caches were for emergencies only, and not to be used freely as a water source. Using an empty plastic jug for extra water storage was beyond my comprehension at the time. If I had fully understood the use of water caches at the time, I would have used the water cache at White Gap and Bulls Gap differently and would have continued my hike.

This trip was a test for me, and when I grade myself, I passed – but I didn’t Ace the exam, either. My inexperience and bad decision or two changed the outcome of the trip and I give myself a grade of “C- to B+”.

This was the longest I had been alone in the woods and my longest continuous hike ever. I was dropped at the southern terminus Wednesday afternoon about 2 pm. I did not see another section/thru hiker the entire time on the trail. In fact, the only other people I interacted with were the staff at Dollar General and someone out walking close to their house by Trammel Trailhead. The Pinhoti is a great trail and if you are looking for solitude, this is a great trail for it. I really enjoyed hiking without seeing anyone and it was really peaceful and helped me think about things without being distracted. I never even listened to music during the trip. I hiked 43.4 miles with over 5900 ft of elevation gain over three nights/four days and ended the trip with no blisters or gear malfunctions. I think all of those are positives.

I DID make a few bad decisions. I tried to do too much with too little and made some bad decisions as a result. Some of those bad decisions were knowingly (not taking enough water over Rebecca Mountain) and unknowingly (not using the empty jugs for water storage).  After those decisions were made, at least I realized the effects of those decisions and made the choice for safety instead of taking a chance.

Now it is time to take my new knowledge and experience to start planning my next section hike of the Pinhoti Trail when it is cooler weather and when there is more water. My current plan it to start at Bulls Gap and hike to Cheaha State Park over a long weekend a distance of 43.9 miles over some very challenging terrain with lots of elevation gain.

Posted in Backpacking | 1 Comment

Pinhoti section hike videos

IF you are interested, here are the videos covering my section hike of the Pinhoti. The first video covers all of my gear and the other four videos were done on trail. This is my first time doing a video on trail and all the editing only using my cell phone.

Posted in Backpacking, Hammock Camping, Hiking, Trip Reports | Leave a comment

Why am I doing my first solo multiday hike?

I have been backpacking and hiking since 2011 and I also served in the Army for 6.5 years. I am no stranger to being in the woods and I have done many multi day hikes with the longest being three nights. I have done solo day hikes and a few solo overnight trips but have never done a solo multiday hike. I initially got the idea of doing a solo hike from watching the show “Alone” on the History channel several years ago. The thought of going solo and having to depend on myself was intriguing. Unlike “Alone”, I planned on taking food and water with me – I’m not THAT crazy!

I have no desire to thru hike a trail, but I DO want to experience a mini version of that experience to test my skill and knowledge. Will I get bored being alone? Will I get tired of walking? There is only one way to find out!

Being inspired by the show, when I turned 50 I had planned to go for a week and was aiming to hike 100 miles. I have spent many nights in the Sipsey Wilderness in Alabama and that area is too familiar, so I wanted to go somewhere new and a trail that was not highly populated. I chose the Pinhoti Trail for several reasons. It’s a long trail – over 300 miles so I can have a mini thru hike experience. It’s well marked and not highly populated. It’s challenging and beautiful. And it’s only a couple of hours from home making it very convenient.

I have hiked sections of the Pinhoti, but not the section I planned on hiking. My initial plan was to start at the southern terminus and go as far north as I could go in a week. I actually had my food and gear packed and the hike scheduled. Several weeks before my planned trip, a couple of friends invited me to join them on a section on the Appalachian Trail during the same timeframe, and I jumped at the chance to join them since I had never been on the AT.

About 7 years ago I participated in the Alabama Make-A-Wish Trailblaze Challenge. The Trailblaze Challenge is a 26.3-mile hike in one day. It is a supported hike with aid stations, and the hike starts before dawn.  The year I did the Trailblaze Challenge, I completed the hike in just over 11 hours. Then I took a break from backpacking due to traveling for work and having a newborn at home.

Over the past year or two I have been doing Hike Support for the Make-A-Wish Challenge. I learned some new trails in my area, and I enjoyed hiking again. While doing Hike Support, I still did all of the training hikes with the longest one being over 20 miles. I enjoyed that experience and I’m doing it again this year, but the draw of trying a solo hike never left me.

I started planning again. Instead of a week, I changed it to Wednesday afternoon to Sunday afternoon. I still plan on hiking north from the Southern Terminus since I have never covered that section of trail. My minimum goal is to reach the starting point for the Trailblaze Challenge, but hopefully go a bit further.

Over the past few years, I have upgraded several items of my backpacking gear which is making my pack lighter. For this trip I will be carrying 4 nights/5 days’ worth of food with me from the beginning. Including all of my food and 2 liters of water, my pack only weighs 24 pounds leaving the trailhead. The forecast calls for warmer temperatures (low in the high 50’s) than I usually hike in, but that also lightens my pack as I won’t have to carry cold weather gear.

I leave next week for my trip. The main purpose is to unplug, enjoy nature, test my skills, and see if I can hike 70 miles from Wednesday to Sunday. I have options if my hike is shorter or longer, so that takes the stress off about HAVING to make a certain mileage. I’m a bit nervous but excited. I’ll post an update once I get off the trail as I won’t have cell signal most of the time.

Wish me luck and I need to remind myself – It’s just walking….

Posted in Backpacking | Tagged , | Leave a comment

It’s getting real! Here’s the gear I’m taking.

My hike days are finally covered by the 10 day forecast. It’s a smidge warmer than I really want with some days reaching in the mid 70s and in the mid 50’s at night. There isn’t any rain in the current forecast, but we’re still 7 days out from the starting date. Most days will be partly cloudy and I’ll mostly be in the woods, so that will help with the warm temperatures. I won’t have to worry about staying warm at night!

I called and scheduled the shuttles. I have treated my clothes with Permethrin. I have packed, repacked, and packed again. I’ve checked everything at least 3 times. My batteries are fully charged. I have spent hours looking at maps and water sources.

This isn’t my first backpacking trip. This isn’t my first multiday trip. This isn’t even my first solo hike or solo overnight. However, it is my first solo multiday backpacking trip. I am looking for the challenge of seeing if I get bored, tired of walking, or if I enjoy it. My plan is to leave Wednesday afternoon and catching a shuttle to the southern terminus of the Pinhoti trail. On Wednesday I’m only hiking a few miles in to camp. Thursday, Friday, and Saturday I will be hiking as far as I can each day. Saturday afternoon I will let the shuttle know where/when to come pick me up. Sunday will be just a few miles to the pickup point. I plan on hiking a minimum of 60 miles, but I’m really aiming for 70 miles. I have options if things go great or not so great.

Since this is a new experience for me I would be lying if I didn’t admit I was a little bit nervous. I’m also viewing this as a test. I have been hiking and backpacking for over 10 years. I have the knowledge and experience – it’s just never been tested in this way or for this long.

I thought I would go over everything I am carrying/wearing before I leave. After the hike, I would like to review what worked great, what could be improved, and see if there is anything I want to trade out or change.

So here’s view quickly going over my gear. It’s less than 9 minutes long, but I cover everything in my pack and what will be on my body. My starting pack weight as shown in the video is 24.14 pounds.

Everything is fine. Everything will be fine….

Posted in Backpacking | Tagged , , | Leave a comment

Attempting video recording, editing, and posting using my phone

In preparation for my upcoming section hike on the Pinhoti trail, I am experimenting with doing some daily videos only using my iPhone

Here’s an attempt I did a local hiking trail.

Posted in Backpacking, Hiking | Tagged , , | Leave a comment

Preparing for my first solo multi-day backpacking trip

If you have been following me for very long, you will know I spend some time in the woods. I have done several solo hikes and many multi-day trips, but I have NEVER attempted a solo multi-day trip.

A few years ago I started watching the TV show “Alone” that airs on the History Channel (at least in the USA). I love the wilderness, resourcefulness, and the various strategies the contestants use to be successful. Inspired by the TV show – and the fact I’ve never done it before – I decided to plan a solo multi day trip.

The main goal of this trip is to mainly see if I can do it. I have been on many day hikes in the 20 mile range and toward the end of the day I’m tired of walking. The whole day I know my vehicle and yummy food are in sight at the end of the day, and I don’t know how I will handle multiple days in a row. Will I get tired of walking? Will I get bored? I feel like I need to find out! This will be as much of a mental challenge as it will be a physical one.

My plan is to start at the southern terminus of the Pinhoti Trail in Alabama. It’s a great trail and with it being just a few hours from my house, it just made sense. I have hiked portions of this trail, but what I plan on hiking will mostly be virgin trail for me. I plan on leaving around lunchtime on a Wednesday in November, driving down, getting a shuttle, and hiking a few miles to a campsite/shelter. The next day the REAL hiking begins!

I would really like to challenge myself to hike 20 mile days for three days in a row (Thursday, Friday, and Saturday) and a short hike on Sunday to the next road crossing. I have been in contact with someone that does shuttles and to leave my vehicle at their place.

The great thing about the Pinhoti trail is that it’s popular, but not crowded like more popular and longer trails. I may go the entire time and see no one – or not. I’d like to challenge myself to hike it alone, but if there just happens to be someone hiking my pace, then that’s OK, too.

I plan to mostly hike just after sunup to sundown. Where I’m located and for that time of year, the sunrise is around 6 am and sunset is around 5 pm. That gives me around 11 hours of daylight. The average temperatures are a high of 66 degrees (Fahrenheit) with an average low of 39 degrees (Fahrenheit). I’ll be watching the weather closely as time gets near and if it is going to be bad weather I’ll shift my trip by a week or two.

I usually hike at about a 20 minute a mile pace when day hiking, but I’m planning on slowing down a bit and planning on 30 minute miles.

There are many options to get off the trail if I get bored/hurt as well as options if things go great and I make great mileage. I have planned out options for a total of 61 miles, 70 miles, and over 76 miles.

My current total pack weight for the trip is right at 24 pounds. That includes 2 Liters of water and food for the trip. The only thing I need to purchase is a new battery bank for my phone, headlamp, etc. My base weight (not counting food and water) is about 14.5 pounds.

I like to plan. I love the details. I have been hiking enough to know things don’t always go to plan, but I still enjoy it. If you’re interested, here’s a list of everything I plan on taking:

I’ll post updates as I continue planning and preparing. I’ll post a gear review if anyone is interested.

Posted in Backpacking, Hammock Camping, Hiking | Leave a comment

Darn Tough Socks. Are they REALLY “Unconditionally Guaranteed for Life”? A personal experience.

Before I get into my unsolicited review of Darn Tough Socks, let me tell you a story about a younger and less experienced version of myself.

When I first got into backpacking and hiking, I went and spent a lot of money at upscale outdoor outfitter. I purchased some leather waterproof ankle height hiking boots because that made sense to unexperienced me. I paired that with a pair of medium thick wool socks to “fill any void” and “provide lots of cushion”.

It went exactly as many of you expected. My boots got wet mid-day on the first day of a 2-day trip. My leather boots seemed to stretch just a bit in all of the wrong places when they got wet (and NEVER dried out). My wool socks suddenly bunched up and caused hot spots. I thought I could “tough it out”. It was ugly. I had fully developed blisters and still had about 8 miles to go.  While I WAS near a road crossing, I was the “leader” of the trip and I had wool socks and I was tough! Let’s just say I had blisters on top of blisters when it was over. I promise you it wasn’t pretty at all!

After that HORRIBLE experience that took me weeks to recover from physically, I thought there had to be a better way, so I started researching. I discovered Darn Tough socks on an online forum for people that hike the Appalachian Trail. I figured if they were good enough for someone hiking non-stop for over 2000 miles, they were good enough for my weekend trips.

If you have been into hiking or other outdoor activities, you have probably heard of Darn Tough Socks (https://darntough.com). If not, Darn Tough is a company in Vermont (USA) that specializes in merino wool blend socks. They make socks for EVERYTHING including socks for hiking, running, ski, snowboard, hunting, work, tactical, and everything in between.  IF that isn’t enough, they offer a product that is “Unconditionally Guaranteed for Life” (https://darntough.com/pages/our-unconditional-lifetime-guarantee).   

After that horrible experience, I used Darn Tough sock exclusively when hiking. I started out wearing them hiking and backpacking. I liked them so much, I bought more to run (THAT didn’t last long) or wear to the gym – or at least with my running shoes. Then I bought a few more pair and now that’s almost all I wear.  I will only wear something else when all my Darn Tough socks are dirty. They are that good. They are good, but they aren’t particularly cheap at an average price of around $20 USD a pair. That is a lot of money for a pair of socks. 

I have written about it before, but I have put several hundreds of miles in a combination of Darn Tough Socks and Altra Lone Peaks. I don’t take my shoes or socks off at water crossings and I have NEVER had a blister that needed any attention on the trail. I am not guaranteeing this experience for everyone, but it has worked for me for many years.

If it’s not obvious, I love Darn Tough Socks. That company has a lot of my money and I REALLY like their products. I also believe that even though they are expensive, I have more than gotten my money’s worth out of every single pair of Darn Tough Socks I own.

So, OK, you get it. I like their socks. So what? Remember me mentioning “Unconditionally Guaranteed for Life”?  Well, I had a pair that I hated wearing. They were crew height like many other pair I owned, but the stretchy property of the sock wasn’t stretchy in the top section of the sock.  The result was that the sock would slide down and bunch up in my shoe.

I made this a “wear only at home” pair, but even then, they bugged me. They were constantly sliding down into my shoe or trying to slide off my foot whenever I wore them without shoes. I was wearing that particular pair of socks one day and during a meeting they FINALLY got the best of me. 

Luckily, my company does not require our cameras on when we are in a meeting remotely.  While paying attention to the meeting, I pulled up www.darntough.com on my other monitor. There was a chat icon in the lower corner of the screen so I clicked on it.

Using the chat feature, I was able to communicate with a customer service representative. I explain to them while the sock wasn’t “worn out” why it had become a pair of socks I didn’t like to wear. Without question, they started a warranty claim and told me that “unconditional” really meant that – except for a few exclusions (pet damage, being burned, or lost). Basically, if you didn’t think the socks no longer meet the Darn Tough standard, the guarantee applies. While I’m not super thrifty, I also don’t like to waste money, either. They quickly sent me an email with the information. I paid to have my clean socks mailed back to them using the warranty information. About a week later, I received an email. They were giving me a code to apply to a new pair of socks of my choice up to $25 USD and it also included free shipping back to me. I placed an order and the socks were shipped the next day.

I debated about using the warranty because I had this pair of socks for many years AND I still had to spend money to have them mailed back. I COULD just throw them away and buy a new pair OR I could spend less than half of the cost of a new pair of socks and use the warranty. I chose the warranty.

Posted in Backpacking, Beginner Series, Gear Review, Helpful information, Hiking | Leave a comment

New Day Pack – ALPS Mountaineering Baja 20 Review

After using the same daypack for approximately 10 years, it was time for a new one. On my old day pack, the elastic on the side pockets had worn out, so every time I bent over, my water bottles would fall out and it was larger than what I really needed.   I also learned a few things from experience that I wanted to change.  I wanted a smaller capacity for day hikes because I don’t carry much more than the essentials, and I wanted a brighter color to be seen off trail in the fall/winter when I do most of my hiking. I REALLY like a bargain, too!

After much Internet surfing, I finally selected the ALPS Mountaineering Baja 20 pack in “Chili/Gray”. It checked off a LOT of my wants. It features include an internal frame, 20 Liter gear capacity, relatively light at 2 pounds, hip belt, suspended mesh back panel (BONUS!!!), a couple of pockets, an integrated rain cover that I’ll never use, it is NOT a neutral color, and is reservoir compatible.

The regular price was $139.99, but I bought it for $84 (on sale and I had a coupon) back in November of 2022 (about 3 months ago) from REI. https://www.rei.com/rei-garage/product/151561/alps-mountaineering-baja-20-pack

I have used this pack on a couple of short day hikes with a total distance of around 20 miles. Overall, I have no complaints so for. One of the biggest differences is that I had to change is my water system. When I’m using my overnight pack (ULA Ohm 2.0), my side pockets sit low enough I can reach my water bottles in the side pockets on either side without assistance. I prefer having two 1 Liter bottles because I think it’s easier to monitor water consumption, and I can put a drink mix (electrolytes) in one of them. This pack does have side pockets, but they sit VERY high, and I could never get a water bottle out on my own. The other reason I carry a 2L water bladder is that it’s a requirement for the Alabama Make-A-Wish Trailblaze Challenge (https://secure2.wish.org/site/TR?fr_id=4503&pg=entry). 

Other than the change in water system (which IS growing on me), I really like this pack.  It is very light and suspended mesh back panel is very comfortable. The hip belt is small (1 inch webbing), and doesn’t have pockets, but it is very comfortable for the weight (10 pounds or less) I am carrying on day hikes.  Instead of using hip belt pockets, I use my Thrupack by Summit Bum to store snacks, my phone, chap stick, and any other items I need to get quickly without stopping. I have used the Thrupack by Summit Bum for the past few years, and I really like it. Here’s my review: (https://jnunniv.wordpress.com/2020/03/20/initial-impressions-of-the-thrupack-summit-bum-pocket/)

Picture: Body side

This is my pack fully loaded for a typical day hike in the 10-mile range. I don’t carry much. I’ll cover what I carry as I go through the review.  I REALLY like the color.  While it isn’t “Hunter Orange” it is in the same family of colors, and I can be easily seen and not mistaken for a deer or other wildlife as I hike typically in the Fall and Winter months.     

Picture: Back side

One of the things I ALWAYS carry is what I call my “poop kit”. It consists of a trowel (http://www.thetentlab.com/Deuce/number2.html) and a waterproof bag that contains wipes and a small bag of hand sanitizer. I keep it stored on the outside of my pack, so it is easily accessible when needed.

Picture: Small outside pocket

This pack does have side pockets for water bottles, but they sit very high and unless you are VERY limber, you will not be able to access them by yourself without taking off your pack. This is another reason I’m using a water bladder. Since I am doing hike support this year, I carry an extra water bottle in each side pocket in case I come across someone that needs additional water.

Picture: water bottle

One of the only “real” pockets on this pack is on the top of the pack. I usually keep my rain jacket in here – even if it isn’t going to rain. I’ve used this jacket as a windbreaker (dual purpose).  At 6.2 oz, I ALWAYS bring it. I’ve done a review of this jacket, and did I mention I wanted the ability to be seen since I do a lot of solo hiking? (https://jnunniv.wordpress.com/2019/09/10/lightheart-gear-rain-jacket-initial-impression/). The other thing in the top pocket that I use is a clip for my truck keys.

Picture: Top pocket

The main compartment is plenty big enough for day hike. I don’t think it would be big enough for even the most ultralight overnight trip – at least not with the gear I have!  The water bladder does bubble out when full which gives you an empty area at the bottom and top of the pack. On a typical day hike, I won’t have much in here other than maybe an additional layer I discarded as it warms up and my water filter (https://wordpress.com/post/jnunniv.wordpress.com/1980) in the bottom if I think I may use more than 2 Liters of water.  

Picture: Inside main compartment

The pack does have a pocket on the very bottom of the pack. It contains an integrated rain shell.  I’ll probably NEVER use it because everything I take on a day hike can get wet. I currently use it to store my First Aid Kit where it is accessible, but out of the way.

Picture: Bottom Pocket

This is me wearing the pack with a full 2-liter water bladder, a water bottle in each side pocket, and my rain jacket/wind breaker in the top pocket. For reference, I am about 5’10” and weight 220 (and hopefully less soon), but it will give you an idea how the pack fits.

Overall, I really like this pack. It carries what I need comfortably, and I have no issues or suggestions for improvement.

Posted in Backpacking, Beginner Series, Gear Review, Hiking | Leave a comment

Updated (again) Water Filter System

My water filter system has been improved and simplified. Again. Here is what what I have have been been using for the past couple of years. I don’t know what I would change EXCEPT bringing the backflush syringe for longer trips. I think this system is the best combination of capacity, speed, and weight. I believe I spent around $100 for everything including shipping a few (pre-COVID) years ago.

I use the CNOC 2 Liter 28mm Vecto Water Container for my unfiltered water. FYI: The 28 mm pertains to the thread size and they make a few different sizes. Make sure you order the correct size thread for your filter.

I REALLY like the CNOC bag for several reasons. First, the top (long orange bar) opens the full width of the container and makes it super easy to fill with water from creeks, streams, and nearly any flowing water. Second, drying out after use very easy since you can remove the cap AND fully open the other end for air flow/drainage. Third, my water filter will securely attach directly to the bag containing my unfiltered water. Lastly, the CNOC bag has a bit of “stretch” to it but has a breaking point of 220 pounds.

I prefer the Sawyer Squeeze (2.5 oz) filter. I had a friend use an identical setup but used the Sawyer Mini (1.4 oz). While the Sawyer Mini is over an ounce lighter AND cheaper, the Sawyer Squeeze filters water over twice as fast. I’ll take that ounce and $ penalty! Here’s a video that supports the speed at which the Squeeze and Mini filter performs in an identical gravity fed system.

After attaching the female end of the Sawyer Squeeze water filter to the CNOC Water container, an adapter will be needed. (I didn’t have one included, but the one linked does).   I don’t remember where I bought mine, but I found these on Amazon. I only used the blue one.  To the male end of the blue adapter, I attached approximately 4 feet of food grade silicon tubing with ¼ inch inner diameter.  I think I bought mine here and you can buy the tubing by the foot.  

I don’t usually hang my CNOC Water Container when using it for gravity feed.  I hold it up when actively filtering or put it on a rock, tree, or another object that is higher than my water bottles. In camp, I will put it in the fork of a tree or another elevated object. One thing I DID discover is that the hose has a tendency to drop and all of the water will then drain out (due to gravity, of course). THAT is a surprise when you are thirsty, so I added a clamp a friend gave me, but here is one similar.

I store the CNOC Water Container, Sawyer Squeeze Water Filter, adapter, tubing, and clamp in an extra drawstring bag. I just confirmed my setup will filter 2 Liters of water in 2 minutes and 10 seconds.

There is one note, however – especially if you are new to filtering water.  The Sawyer Filter needs to be kept from freezing. If water freezes inside the filter, the pores will permanently enlarge, and the filter will be unreliable against protozoa and bacteria. If temperatures dip below freezing, keep the sawyer water filter close to your body while hiking, or in your sleeping bag during the night. It also will need backflushed occasionally. How often depends on the quality of water you are putting through it, but I ALWAYS check that it is working properly before a trip and backflush after a trip. I didn’t do that one time and luckily a buddy also had a water filter.  I now carry some Aquamira as a backup. I also keep it in the same Ziploc bag if the temperatures dip below freezing.  

Posted in Backpacking, Beginner Series, DIY, Gear Review, Hammock Camping, Hiking | Leave a comment